

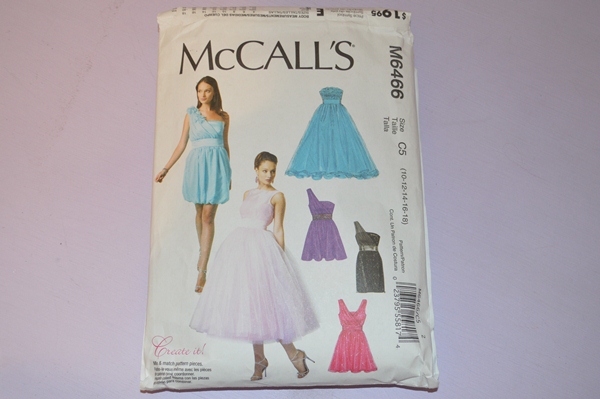
Pattern Review: McCall’s 6466 Tulle Skirted Prom Dress
I’d set my heart on making myself a dress for my work’s Christmas party. The dress code was black tie so what better to create than an evening dress? Not sure if I’ve mentioned this before but my dream job would be Thelma Madine’s (Big Fat Gypsy Wedding) but in my life, there’s not much call for gowns or even cocktail dresses so this was my chance to do something special. It took me a while to decide on a pattern – I’d fallen in love with this McCall’s pattern as soon as I saw it but it took me a while to convince myself that I could pull it off and that it was appropriate for the occasion, after some soul searching and sending the photo round to the girls at work I was sold! I bought my pattern from www.sewdirect.com – they have a great range of patterns from the likes of Vogue, Butterick, Kwik Sew and, of course, McCall’s plus if you’re a member (like me) you get a discount on each one you buy – bargain!
The next step was deciding on a colour, I’m not going to go into too much detail around the trials and tribulations of this but suffice to say, if you’re relying on the internet and specifically eBay for your fabric, colour matching is not as easy as you’d think! In the end, I settled on silver – this pattern calls for sheer fabric (I used organza), tulle and lining. This pattern required ALOT of fabric – about 20m. Please note that on the McCall’s website the metric fabric requirements chart has a typo in it for the tulle – they may have updated this as I emailed them about it but don’t let it catch you out!
I didn’t take a lot of pictures which I regret now, unfortunately, it took so long for me to decide what I wanted to make and then for the fabric to arrive that I was in quite a rush to get it finished in time.
The bodice section is really simple and from start to finish only took a couple of hours. I bought some silk pins for the light fabric and overpinned the fabric to the pattern pieces for cutting to avoid it slipping. This worked really well and the pins left no marks in the fabric. The instructions are straight forward, the fitting is true to size and it is finished really nicely with all the fabric edges secured on the inside of the the two layers of fabric. One thing that’s not mentioned in the pattern is that you will need to hem the top edge of the lining fabric to prevent it from fraying but it’ll be hard for you to miss this when you’re putting your pieces together.

The bodice lulled me into a false sense of security, the hard part came with the tulle skirt! I had never sewn with tulle before, or organza come to that, I didn’t really know what I was letting myself in for! The pattern calls for two layers of contrasting tulle which sits in the middle of 2 sets of 2 layers of tulle, because I found colour matching so difficult I decided to change this a little and make the contrast out of the same organza as the bodice and layer this on top of the tulle so that there wouldn’t be a stark contrast between the bodice and the skirt which worked quite nicely.
The skirt takes a long time – each layer is made up of 4 pieces which is about 4 metres of fabric across. Tulle is a tricky fabric to work with, it sticks to itself and, in silver anyway, is particularly hard to see. (I find these days that I’m turning into my mother and grandmother and complaining how hard it is in general to see in electric light!). The cutting took hours, the pinning took hours, the sewing took… probably only an hour for all the layers combined!
The next area I had trouble with was the gathering, this was entirely my own fault because I was doing it at 1am on a Wednesday evening, two nights before the party! My thread snapped three times when I was trying to gather the skirt round the waist. I’d done the recommended two rows of stitching but my thread just wasn’t strong enough, after the third snap I realised this was probably best left until the next evening (the night before!) and gave up. With a day’s thought behind me and some stronger thread, the gathering was a cinch and really quite enjoyable! It still amazes me how all that fabric scrunches up into such a small space. Whilst the gathering was now perfect, unfortunately the organza had frayed around the top which caused problems when it came to sewing the waistband. In the end I had to cheat and use FrayStoppa liquid – I don’t think that would have been necessary had I gathered it right the first time though.
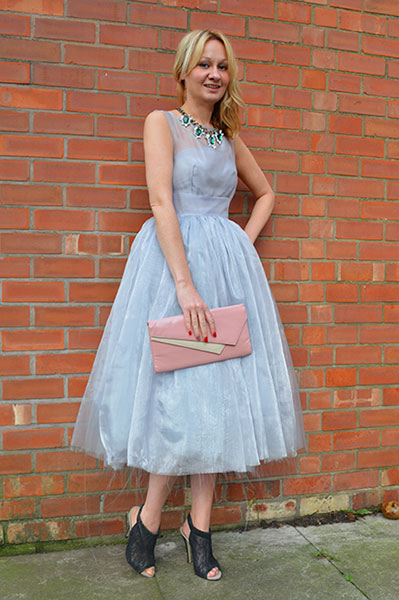
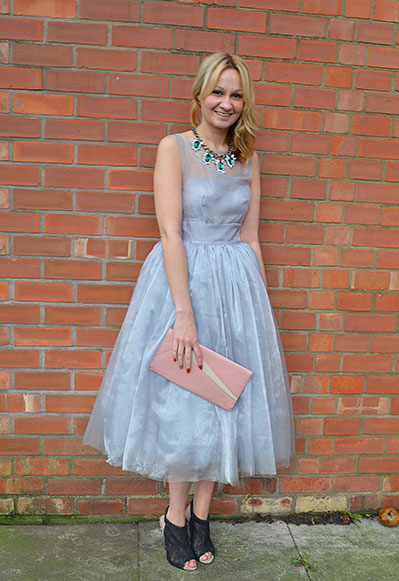
The final step was inserting the hidden zip which I didn’t find to be a problem – I’m quite confident with zips anyway and, once properly pinned, this was easy to attach. Once finished, I found the skirt to be too long – a couple of inches above my ankles (I’m just over 5’7″) so I had to trim about 6 inches off the skirt for it to fall where I wanted it to. If I’m honest I did this a couple of hours before the party so didn’t have time to hem the organza but (call me crazy) I actually quite liked the way it spider webbed to a raw edge throughout the night – particularly when my boss told me that I looked like Cinderella at the ball so it was a little bit like pumpkin time was on the way!
I really do love the dress, it’s a real showstopper and made me feel like a princess. This pattern is well worth the investment, not only does it make this prom dress but as a ‘Create It’ pattern it includes a variety of mix and match pattern pieces for you to create umpteen variations.
Skill: Intermediate
Timescale: 1 week ( I work full time so this is 2 weekend days and weeday evenings)
Finished piece: 5/5 – a showstopping dress that suits special occasions.
Worn with lace heels (Topshop), pink clutch bag (Barratts), Wander and Hunt DIY Necklace (post on this coming soon). Excuse my red nails – these were silver on the night but I didn’t get any decent photos!


6 Comments
Louisa
Oooh. I have this pattern but have not even taken it out of the packet yet. It looks lovely, I shall have to get my act together and make my own now!
Josianne
Wonderful did you use 22 meters long of tulle for this ! because the result is amazing
Susan
I was thinking of making this for my daughter’s prom. Can I ask a couple questions? How is the sheer outer bodice attached to under bodice and did you use boning like the pattern states? And you said you put the organza on the outside of the skirt? Why are each skirt layers four pieces? Are they not just straight rectangles, or are they cut on some kind of curve? Lastly, about how much did this cost to make?
Catherine
Hi Susan,
I’m so sorry that I haven’t replied to you sooner. The bodice and under bodice are only attached at the waistline. I alternated layers of organza and tulle with organza as the top layer. The skirt pieces are trapezoid shape to give a fuller skirt at the bottom so it needs to be cut in multiple pieces to get the shape. It cost about £50 to make because there are so many meters of tulle but it was worth it as I did have a Cinderella moment in it! Hope this helps, if you have any more questions let me know 🙂 x
Kaitlyn
How did you end up cutting out the tulle skirt? I am trying to do that now and am struggling with it. I cannot figure out if the pattern needs to be made into a whole or do you only cut out the half and leave the shaded pattern area not cut out? If you could tell me soon that would be great! I have to have this finished by Monday!
Catherine
Hi Kaitlyn,
Sorry for the delay in getting back to you, had to dig out the pattern to see what you meant. You cut the tulle on the fold so that it opens out into the full skirt piece, the shaded side indicates the half that is underneath – hope that helps. Let me know how it goes 🙂 x